Interior & Storage
Interior:
Even if you love the exterior looks of your Shasta, there are a myriad of ways to customize the interior to your preference, whether it be paint, curtains, or a complete redesign of the rear gaucho area. Some folks tire of tearing down the bed each morning...one solution I've seen is modifying the rear gaucho into small benches that face each other with a flip-up or removable table that can be left in place (like a restaurant booth for two). While I haven't done anything this drastic, the below chronicles the changes I've made so far....
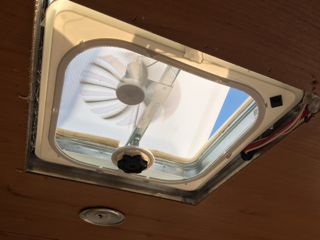
Ceiling/Exhaust Fan: A popular accessory that makes all the difference is replacing the stock ceiling exhaust fan with a Maxx Fan or Fanastic Fan. These will pull air through at a much greater rate and are quieter as well. We installed the Fantastic model 810032 and added a switch to reverse the polarity so it toggles between intake/exhaust (feature also available on the higher end models). You’ll have to ‘dig out’ the sealing compound on the roof to get to the screw heads on the old unit. A battery impact makes for fast screw removal. As the roof is an aluminum skin, be careful to keep your weight off it while working.
Pull the fuse for the motor, then remove the interior trim piece. The factory wiring will be visible and you can snip the leads, leaving enough to connect the new unit. With sealant and exterior screws removed, the old unit will lift out.
The new unit should drop right in and installation is straightforward. After all exterior screws are in place, cover the screw heads and seam with Dicor self-leveling sealant. The new interior trim piece is designed to accommodate various thickness roofs, so you'll need to cut it down to 'height' so it'll fully seat. Just a heads-up, I found the pin-switch on the new unit to be loose....as this can cause intermittent operation, it's worth checking out before you install yours.
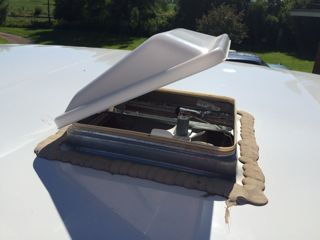
Original exhaust fan- use a plastic putty knife to work up the old sealant.
|
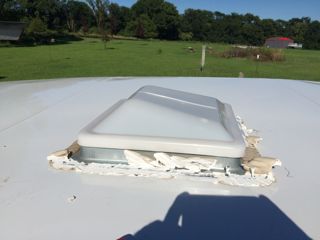
Next remove square-drive screws under sealant.
|
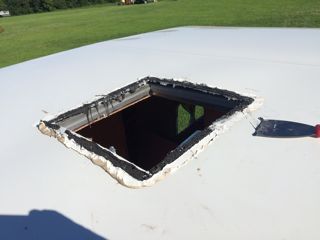
After disconnecting wiring and interior trim, unit will lift out from above.
|
Interior trim pulled. Note wiring at right.
|
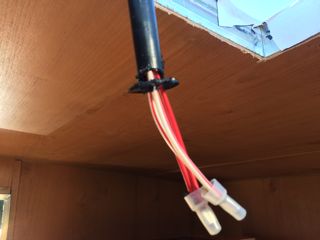
The factory got a little over-zealous with their router and cut right through the protective wiring sleeve.
|
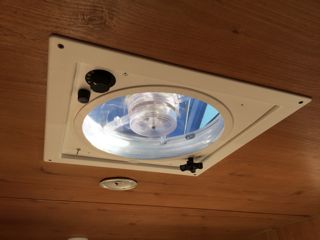
The finished product- unit screwed in from above, wired up, and interior trim piece installed.
|
Undercabinet Lighting: While adding the shelf over the sink, I continued a 12V wire pair down into the right hand cabinet and mounted an LED kitchen undercab light to the bottomside of the cabinet. It's powered off the vent hood light switch, but being equipped with its own switch, it can be turned off when it's not needed (it is BRIGHT!)
USB and 12V Ports: If you get on eBay, you'll find lots of cheap USB and cigarette lighter style 12V sockets that will run directly off 12 volts. Mounting these on the side of the LH bench means they're out of the way, but still convenient if needed to charge a phone. Because some of these USB units can cause radio interference, and because they all seem to have an annoying blue light that will keep me up at night, I added a miniature toggle next to them to power them off when not needed.
The Sagging 'Gas Lamp': One of the neat touches of the reissue is an LED+Incandescent version of the original gas light, mounted above the front table. But there are two problems- the weight of the globe causes it to sag, and where the switch is mounted means you'll smudge up the glass globe with your hand when you're trying to turn the thing on. I fixed both problems by adding a steel plate behind the 'too thin' decorative mount which really firms it up, and by adding a pull chain in series with the rotary switch.
|
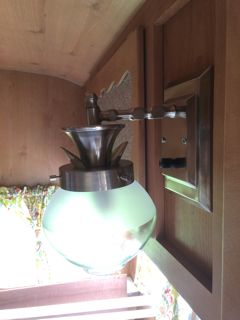
Original lamp...look how it sags. Plus the screws used looked cheap
and were run in at an angle.
|

Steel plate installed (prior to addition of pull chain switch). This thing is rock-solid.
|
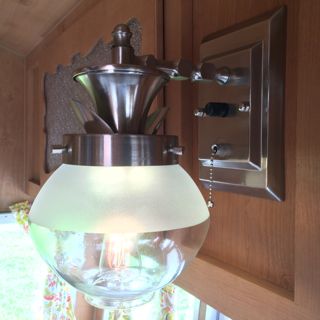
Modified unit reinstalled, complete with chrome acorn nuts.
I added a small extension to the pull chain after this photo was taken.
|
Dinette Table Leg: I nearly sliced my hand open reaching under the table to fold up the leg..and it turns out I'm not the only one. Two things are at play here: 1. The legs (at least on a number produced) were cut too short, so a couple small sections of "wood" were screwed together as a spacer...but the screws mounting it to the table are angled inward at each other- this makes for a weak joint and the screws potentially pop up under the formica top. This fix required drilling new pilot holes that spread outward to make a stronger connection. 2. To save money, long piano hinges were cut into short sections and these were used as the leg hinge. Unfortunately, the sharp edges were never filed down. Take your time and file these smooth, or replace the hinge.
Dinette Bench Cushions: Two problems here...one, the cushions are supposed to stay in place with velcro strips, but the strips end up pulling off the wall, or the strips can't make contact because of other obstructions. The best way to fix this is to take a page from other RV's and sew loops onto the top of the cushions which will mate with snaps screwed into the wall (locate actual framing members within).
Two, you find yourself sitting completely upright with the cushions against the 90-degree walls. Using small diameter pool noodles, the cushions will sit at a comfortable angle, and you can toss the noodles under the table when it's transformed into a bed.
|

Pool noodle (small diameter version) works great behind the cushions.
|
This velcro has to go.
How can it even work with the window trim sitting proud?
|
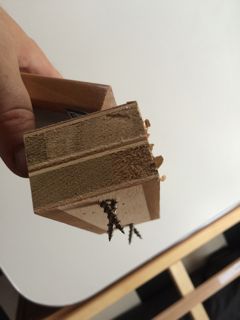
The table leg after removal. Look how the factory screws "bunch",
making for a very weak connection.
|
That Floor: If you haven't noticed yet, the checkerboard flooring can be a real pain to try to keep clean, especially if you're, you know, camping. While I haven't done it yet (it's on the list), putting down VCT over the roll flooring can add a little style while also making the floor a lot easier to keep clean. Cutting the 12x12 squares down to 9x9 keeps with the vintage look and scales better with the interior, but be warned, not every wall or cabinet is truly at 90 degrees, so measure, mark, and measure again as you go.
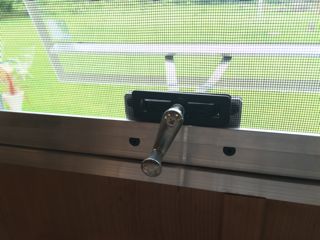
Window Cranks: One of the first things that had to go were those plastic window knobs. I replaced these with aluminum cranks from Vintage Trailer Supply. VTS-324S worked well for the majority of windows, while 324M (a little longer) replaced the knobs on the front windows. I left the plastic knobs in place in the bathroom since they sit flush.
Storage:
Door Supports: I found the overhead doors at the front and rear bulkheads to be a real pain in the butt as you have to use one hand to hold them open. Do yourself a favor and pick up two packs of RV Designer H279 6-1/4 "cabinet door supports”. They come in pairs but you only need one per door. While I was at it, I didn’t like how the latches were centered on the front doors. You could rock the entire door back and forth on that pivot point. Since the rear doors now ‘snap in’ so well (and inexplicably had two each?) I stole the center latches from each door (and mounted the supports there). Up front, I moved the centers to one corner and used the extra rears for the other corner. Now they shut nice and tight.
Upper Cabinet Ball Chain: Hopefully, you haven't figured this out the hard way, but the cabinet door over the stove will contact (and gouge) the ceiling if opened too far. For a couple bucks, you can solve the problem with some ball-chain and ball end loops from the local hardware store.
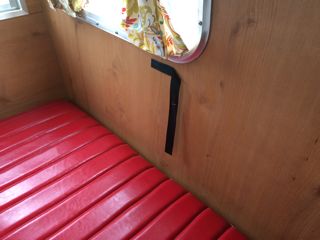
Rear Closet: I also noticed the rear ‘closet door’ (small vertical door on the 16’) was both over-length and mounted too low. It would wear across the rear gaucho vinyl AND hit the rear window curtain bar when open. Ultimately, I decided it worked better to remove the door entirely and fill the screw holes with light color putty. Since the opening is factory trimmed, you never even know it had a door. This cubby will get a battery operated tap-light and likely a small rod to hang clothes.
|

Door struts on rear compartment doors.
Latches mounted on outboard ends.
|
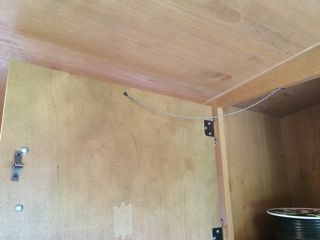
Ball-chain attached to door over stove.
|
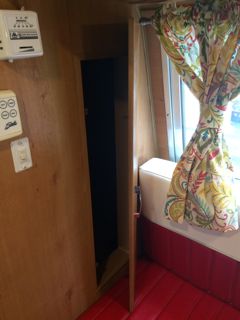
This door had to go!
Contact with the curtain rod & scraping up the cushion.
|
Storage Compartment Locks: See the Tips and Tricks section about replacing the storage compartment lock cylinders with something more secure.
Built-In Cubbies (both on my To-Do list)
Adding a door to the end of the right side dinette bench makes for easier access to stash shoes, boots or other gear without disturbing the bench cushions, or worse. Very handy when you step inside the door and don't want to track dirt everywhere.
There's also unused space in the area behind the left bench upper seat back. This area is perfect for sliding panels to stash smaller items, like a deck of cards, a cell phone, flash lights or, if you like to knit, your wool and needles.
Return to Home
Cory Heisterkamp 2017